
It is generally advised not to grant bots the "Administrator" or
"Manage Server"
permission except when
required. As Role Prototype is correctly configured, these permissions are not
required.
You should
not set them for the bot.
Introduction
Role Prototype is developed by Teddy#0001 and implements easy-to-configure auto-assignable roles via Discord's select menus. You can learn more about Discord's select menus here. On April 9th, 2022, a complete rewrite of the bot was released, which added slash commands, context menus, and more!
Want to use Role Prototype in your community?
Currently, this bot is not available
to the public and you may request access to
use Role Prototype here! (Note: You do not
need to do this if I referred you here!)
Role Prototype is subject to my privacy policy and terms of service for bots.

Before we begin...
The artwork used currently is from DDLC+.
The preview images used in this guide are from the SWTOR Discord
Community
and an internal testing
server.
This document was built with bulma and
bulmaswatch upon
popular request for dark mode.
I would like to offer a special thanks to the following contributors and testers: Soaring__Sky#1313 and Jedi#0001
Using this Guide
In this guide all command parameters in []
are required, while those in () are
optional. They are only indicators for you, you should not include
[] or () when
using the command. As an example, [messageid] should
be typed as
just 1234567890. [#channel],
requires that you mention the channel. Commands will appear in red text and
parameters in blue.
In this guide when quotes are shown within the brackets,
they are required for use of the bot. As an example, ["Role
Name"] should be typed as
"MyCuteRole" when using the command.
The default prefix for Role Prototype is
r:. You can change this with r:set prefix
[newprefix] (Note: You must have the
"Manage
Server" permission to use set command.) To avoid confusion, the
prefix is
not included in this guide's
display of commands.
If you need any help with the setup and configuration of Role Prototype you may reach out to me on Discord via DMs or my support server. Please keep in mind that features listed as a Beta Feature may not be available for your community yet.
Permissions
The following permissions are required for the bot to operate in a server:
- Send Messages
- Manage Channels
- Manage Roles
-
Embed Links?
- Manage Messages
The following permissions are optional depending on which features you use:
-
Kick Members!
The following permissions are required for staff to manage role features on bot:
- Manage Roles
Heads up! You may need to grant the bot per-channel permissions! The bot will need the "View Channel" permission for channels in which the commands are used. It is strongly recommended that you use a staff-only channel.
Step 1: Create Embeds.
In order to begin, you'll need to create embeds that will contain the select menus.
The embed command will create an embed that the
bot can access and attach a menu to.
embed [#channel] [#color] ["Title"] ["Body"]You will need the correct ["Body"] format when using the non-slash command version, which
includes having all
line breaks replaced with \n. You can use this tool to do this for you.
Please do
not include double quotes in the Title or Body field
as this will result in cut-off.
The following demonstrate the correct and incorrect ["Body"] format respectively.
"This example is correct.\nThis new line will not break.""This exmaple is not correct.
This new line will break the command."Slash Command
This command now works with slash commands and modals! You do not need the above body formatting when using slash commands and can type as you wish for it to appear in the provided modal!
/embed [#channel]Here is an example of the full command's usage:
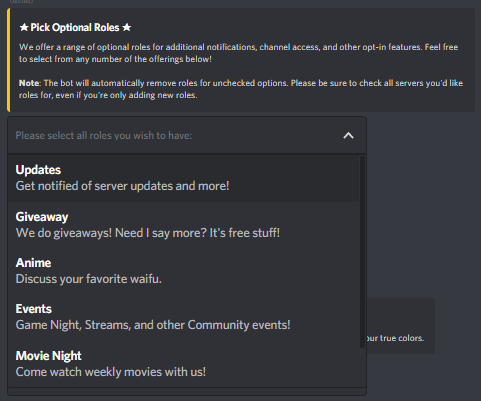
embedmessage #roles #cccccc "Pick a Role!" "This is a description of the roles available.\n\n**Note**: The bot will automatically remove roles for unchecked options."embed as an alias for the command.
Step 2: Add Roles!
Now that you have an embed, you can start attaching roles to that embed. Please note the bot can only attach roles to a message it has created itself.
addrole [#channel] [messageid] ["Role Name"] ["Role Description"]You don't need a command for this anymore! On Desktop you can use the right-click context menu ("Apps") to "Add Role" to the menu using a modal!
- Each menu is limited to 22 roles.
- A role can, as of now, only be linked to one menu at a time.
- Per Discord's limitations, for use in a select menu, a role name cannot exceed 25 characters, and the description cannot exceed 50 characters.
After this, no additional configuration is required! Your new roles should be available for assignment!
So, you want to use buttons instead?
You can use the command addbutton in the
same manner:
addbutton [#channel] [messageid] ["Role Name"] ["Button Label"]Step 3: Recommended Notices
There are a few notices we recommend you share
to
your users about the functionality of select menus and embeds. It is recommended to use
the Selection Warning in the introduction and the Embed
Warning at the end of your channel using the send command.
Optional Steps
For most users, after finishing adding the roles, you'll be all set and the bot will handle the rest entirely in the background. The following additional functions exist for maintaining or enhancing the core bot experience.
Manage Roles
Role Prototype allows you to make adjustments to role menus including adding cosmetic features such as emojis.
Remove Roles
You can remove a single role with
removerole:
removerole [#channel] [messageid] ["role name"]You can remove all roles from a message with
clearroles:
clearroles [messageid]Limit Roles
A locked message will allow users to obtain only one role from a menu. When they select a new role, all others will be removed automatically. This is useful for cosmetic color roles where a user needs only one.
You'll need to use the lock
command
after adding all roles. This command will toggle the lock status on and
off.
lock [#channel] [messageid]Add Emojis
You can add an emoji to a role selection option after it has been created. Please note you may only use default emoji or custom emoji from the same server.
setemoji [#channel] [messageid] [emoji] ["role name"]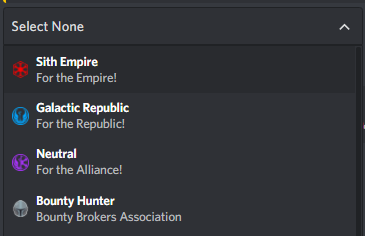
Edit Role Descriptions
You can change the description of a role in a
menu by
using the settext command. Per Discord's limitations, this can only be 50
characters.
settext [#channel] [messageid] ["role name"] ["new value"]Edit Role Labels
Beta Feature
In select menus, the label is the bold
text within an option. Select Menus by default will use the role's name as
a label, however, the
setlabel command can customize this. When used on buttons, this command
will change the button's text.
With both, the limit imposed by Discord is 25 characters.
setlabel [#channel] [messageid] ["role name"] ["new value"]Set Button Style
Added in 4.6.0 Beta Feature
You can change a button's style by using the
setstyle command.
setstyle [#channel] [messageid] style ["role name"]The following styles are allowed by Discord:
- blurple (blue-purple)
- red
- green
- grey
Role Information
You can view roles attached to a message with
roles:
roles [#channel] [messageid]You can view which channel and message a role
is
attached to, as well as other roles, and the lock status with getrole:
getrole ["role name"]Override "Select None"
You can change or disable the auto-remove all
field
("Select None") option by using setnone:
setnone [#channel] [messageid] "title" "description"You may also use disable to
disable the
Select None option entirely for that menu. Want to re-enable? Simply use the above
option and it will automatically
re-enable. The defaults are "Select None" and "Select only this to remove all roles
listed here."
setnone [#channel] [messageid] disableVerification System
The verification system is designed to automatically remove members with or without a specific role after a fixed amount of time.
verify [with/without] [time] ["hour"/"hours"/"minute"/"minutes"] ["role name"]"With"
In this setup, you would provide a user with a role upon join and your verification
process will remove the
role. You may use the Automated Role
Assignment feature to do this. After the time expires, if the user still has the
assigned role, they'll be removed.
"Without"
In this setup, you would have your verification process assign a user a role after
they've completed it. After
the time expires, if a user does not have the required role, they'll be removed. This
setup is often used in membership-gated communities.
For example, using verify without 1 hour
"Member" will kick any user who joins and does not obtain the
"Member" role after one hour.
You can disable the system by using
verify
                                    none
Automated Role Assignment
Added in 4.4.0
The automated role assignment system will automatically grant a role to a new user when they first join your server. This can be optionally used in coordination with the Verification System feature.
autorole ["role name"]You can also use "none" or "disable" in place of the role name in order to disable the automatic assignment.
Manage Messages
Role Prototype allows for the management of embeds. You can use this system to create fancy rules that can be editable easily by your staff instead of relying on a single administrator to do so.
Send Plain Messages
In some cases, you'll want to use non-embedded
messages. To do this, use the send command:
send [#channel] ["message to send"]Edit Messages
You can re-customize an embed including title,
body
and color using editmessage:
editmessage [#channel] [messageid] [title|body|color] ["new value"]As an example, you can change the title with the following:
editmessage #roles 12344321 title "★ Select Deez ★"If you'd like to edit a non-embedded message
created with
send then use body as the field to edit. Similar to the "Add Role" right-click context menu ("Apps"), you can use "Edit Embed" to edit a Role Prototype created embed.
View a Message
In some cases you'll want to grab the contents
of a
message with the markdown and additional formatting for easy edits. The
view command will enable you to
do so:
view [#channel] [messageid]Attach an image
You may attach an image to an embed by using
the
setimage command:
setimage [#channel] [messageid] [url]As an example setimage #channel 1234567890
https://i.myimageserver.com/cutie.png
You can remove an image from an embed by using
image as the field in editmessage
command by itself, like so:
editmessage #channel 1234567890 image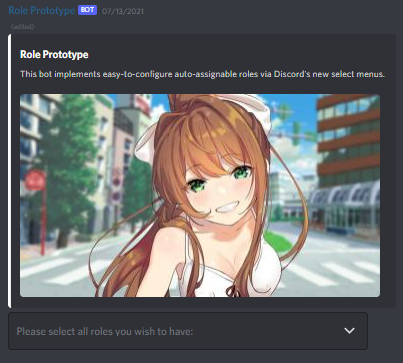
Clone Message
The clone message feature can copy either embeded or non-embedded message into a new message. This is useful for migrating an embed from an older bot to the current.
clone #channel 1234567890cp is an alias for clone.
Troubleshooting
The bot is designed to correct any issues it may encounter or will notify you when something isn't quite right. In most cases the error will suggest how to remedy the issue. If an unknown error occurs, please contact Teddy.
Error Messages
The role provided contains dangerous permissions and cannot be auto-assigned.
This error means you have attempted to make a role auto-assignable which contains the Administrator or Manage Server permission.
In some very rare instances the bot may need to
be
forced to rebuild a menu. The rebuild command will tell the bot to rebuild
a menu:
rebuild [#channel] [messageid]